学习 WaveNet 的渐进式融合思想,实现树状分层结构来构建更深的语言模型。
LLM 演进史 (四):WaveNet——序列模型的卷积革新
本节内容的源代码仓库。
我们在前面的部分搭建了一个多层感知机字符级的语言模型,现在是时候把它的结构变的更复杂了。现在的目标是,输入序列能够输入更多字符,而不是现在的 3 个。除此之外,我们不想把它们都放到一个隐藏层中,避免压缩太多信息。这样得到一个类似WaveNet的更深的模型。
WaveNet
发表于 2016 年,基本上也是一种语言模型,只不过预测对象是音频序列,而不是字符级或单词级的序列。但从根本上说建模设置是相同的——都是自回归模型 (Autoregressive Model),试图预测序列中的下一个字符。

论文中使用了这种树状的层次结构来预测,本节将实现这个模型。
nn.Module
把上节的内容封装到类中,模仿 PyTorch 中 nn.Module 的 API。这样可以把“Linear”、“1 维 Batch Norm”和“Tanh”这些模块想象成乐高积木块,然后用这些积木堆出神经网络:
class Linear:
def __init__(self, fan_in, fan_out, bias=True):
self.weight = torch.randn((fan_in, fan_out), generator=g) / fan_in**0.5
self.bias = torch.zeros(fan_out) if bias else None
def __call__(self, x):
self.out = x @ self.weight
if self.bias is not None:
self.out += self.bias
return self.out
def parameters(self):
return [self.weight] + ([] if self.bias is None else [self.bias])Linear,线性层这个模块的作用就是 forward pass 的过程中做一个矩阵乘法。
class BatchNorm1d:
def __init__(self, dim, eps=1e-5, momentum=0.1):
self.eps = eps
self.momentum = momentum
self.training = True
# 使用反向传播训练的参数
self.gamma = torch.ones(dim)
self.beta = torch.zeros(dim)
# 使用“动量更新”进行训练的缓冲区
self.running_mean = torch.zeros(dim)
self.running_var = torch.ones(dim)
def __call__(self, x):
# 计算前向传播
if self.training:
xmean = x.mean(0, keepdim=True) # 批次平均
xvar = x.var(0, keepdim=True) # 批次方差
else:
xmean = self.running_mean
xvar = self.running_var
xhat = (x - xmean) / torch.sqrt(xvar + self.eps) # 将数据标准化为单位方差
self.out = self.gamma * xhat + self.beta
# 更新缓冲区
if self.training:
with torch.no_grad():
self.running_mean = (1 - self.momentum) * self.running_mean + self.momentum * xmean
self.running_var = (1 - self.momentum) * self.running_var + self.momentum * xvar
return self.out
def parameters(self):
return [self.gamma, self.beta]Batch-Norm:
- 具有在 back prop 外部训练的 running mean & variance
self.training = True,这是由于 batch norm 在训练和评估这两个阶段的行为不同,需要有这样一个 training flag 来跟踪 batch norm 在状态- 批次内处理元素耦合计算,来控制激活的统计特征,减少内部协变量偏移(Internal Covariate Shift)
class Tanh:
def __call__(self, x):
self.out = torch.tanh(x)
return self.out
def parameters(self):
return []与以前局部设置一个 g 的torch.Generator相比,后面直接设置全局随机种子
torch.manual_seed(42);下面的内容应该很眼熟,包括 embedding table C,和我们的 layer 结构:
n_embd = 10 # 字符嵌入向量的维度
n_hidden = 200 # MLP 的隐藏层中神经元的数量
C = torch.randn((vocab_size, n_embd))
layers = [
Linear(n_embd * block_size, n_hidden, bias=False),
BatchNorm1d(n_hidden),
Tanh(),
Linear(n_hidden, vocab_size),
]
# 初始化参数
with torch.no_grad():
layers[-1].weight *= 0.1 # 按比例缩小最后一层 (这里是输出层),减少初期模型对预测的自信度
parameters = [C] + [p for layer in layers for p in layer.parameters()]
'''
列表推导式,相当于:
for layer in layers:
for p in layer.parameters():
p...
'''
print(sum(p.nelement() for p in parameters)) # number of parameters in total
for p in parameters:
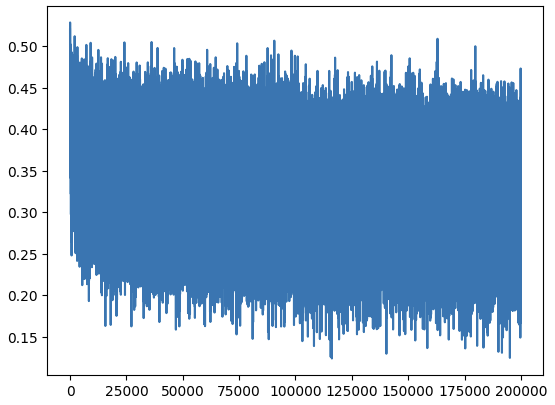
p.requires_grad = True优化训练部分先不做修改,继续往下看到我们的损失函数曲线波动较大,这是因为 32 的 batch size 太小了,每个批次中你的预测可能非常幸运或不幸(噪声很大)。
在评估阶段,我们要将所有层的 training flag 设置为 False(目前只影响 batch norm 层):
# 将 layer 置于评估状态
for layer in layers:
layer.training = False我们先解决损失函数图像的问题:
lossi 是包含所有损失的列表,我们现在要做的基本就是把里面的值取平均,得到一个更有代表性的值。
复习一下torch.view()的使用:
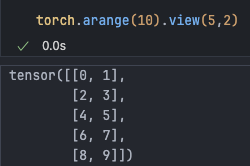
等同于
view(5, -1)
这可以很方便的将一些列表中的值展开。
torch.tensor(lossi).view(-1, 1000).mean(1)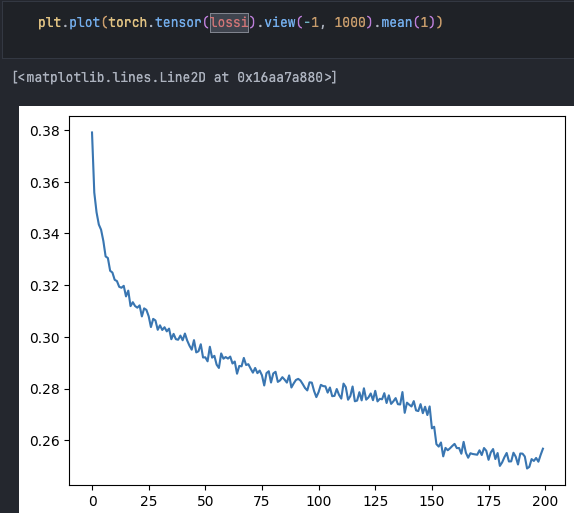
现在看起来好多了,图中还能观察到学习率减少达到了局部最小值。
接下来,我们把下面所示的原先的 Embedding 和 Flattening 操作也变为模块:
emb = C[Xb]
x = emb.view(emb.shape[0], -1)class Embedding:
def __init__(self, num_embeddings, embedding_dim):
self.weight = torch.randn((num_embeddings, embedding_dim))
# 现在 C 成为了 embedding 的权值
def __call__(self, IX):
self.out = self.weight[IX]
return self.out
def parameters(self):
return [self.weight]
class FlattenConsecutive:
def __call__(self, x):
self.out = x.view(x.shape[0], -1)
return self.out
def parameters(self):
return []PyTorch 中还有一个容器的概念,基本上是一种将 layer 组织为列表或字典等的方式。其中有一个叫Sequential,基本作用就是把给定的输入按顺序在所有层中传递:
class Sequential:
def __init__(self, layers):
self.layers = layers
def __call__(self, x):
for layer in self.layers:
x = layer(x)
self.out = x
return self.out
def parameters(self):
# 获取所有图层的参数并将它们拉伸成一个列表。
return [p for layer in self.layers for p in layer.parameters()]现在我们有了一个 Model 的概念:
model = Sequential([
Embedding(vocab_size, n_embd),
Flatten(),
Linear(n_embd * block_size, n_hidden, bias=False),
BatchNorm1d(n_hidden), Tanh(),
Linear(n_hidden, vocab_size),
])
parameters = model.parameters()
print(sum(p.nelement() for p in parameters)) # 总参数数量
for p in parameters:
p.requires_grad = True因此得到了更一步的简化:
# forward pass
logits = model(Xb)
loss = F.cross_entropy(logits, Yb) # loss function
# evaluate the loss
logits = model(x)
loss = F.cross_entropy(logits, y)
# sample from the model
# forward pass the neural net
logits = model(torch.tensor([context]))
probs = F.softmax(logits, dim=1)实现层状结构
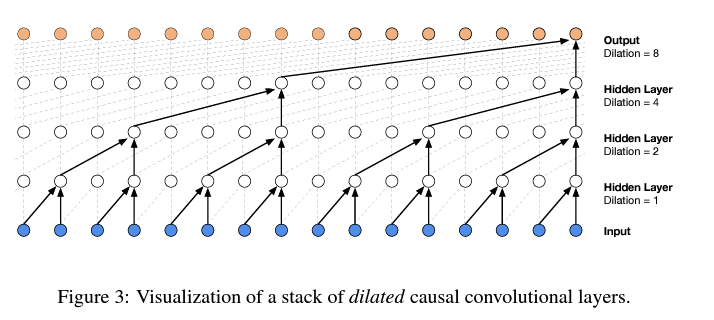
我们不希望像现在的模型一样,在一个步骤中就把信息都压到一个层中了,我们希望像 WaveNet 中预测序列中的下一个字符时,把两个字符融合成一种双字符表示,然后再合成四个字符级别的小块,用这样的树状分层结构慢慢把信息融合到网络中。

在 WaveNet 的例子中,这张图是”Dilated causal convolution layer”(扩张因果卷积层)的可视化,不用管它具体是啥,我们学习它的核心思想“Progressive fusion(渐进式融合)”即可。
增加上下文输入,将这 8 个输入字符以树形结构进行处理
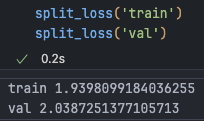
# block_size = 3
# train 2.0677597522735596; val 2.1055991649627686
block_size = 8仅仅将上下文长度扩大就得到了性能提升:
为了弄清我们在做什么,现在观察经过各个 layer 过程中 tensor 的形状:
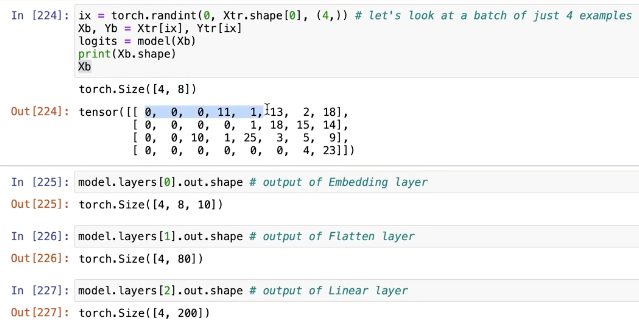
输入 4 个随机数,在模型中的形状就是 4x8(block_size=8)。
- 经过第一层(embedding),得到了 4x8x10 的输出,意义就是我们的 embedding table 对于每个字符都有一个要学习的 10 维向量;
- 经过第二层(flatten),就像前面提到的那样会变成 4x80,这个层的效果是将这 8 个字符的 10 维嵌入拉伸成一长行,就像是连接运算。
- 第三层(linear)就是将这个 80 通过矩阵乘法创建 200 个通道 (channel)
再次总结一下,Embedding 层最终完成的工作。
这个回答中说的非常好:
- 将稀疏矩阵经过线性变换(查表)变成一个密集矩阵
- 这个密集矩阵用了 N 个特征来表示所有的词。密集矩阵中表象上是一个词和特征的关系系数,实际上蕴含了大量的词与词之间的内在关系。
- 它们之间的权重参数,用的是嵌入层学习来的参数进行表征的编码。在神经网络反向传播优化的过程中,这个参数也会不断的更新优化。
而线性层在 forward pass 中接受输入 X 将其与权重相乘,然后可选地添加一个偏差:
def __init__(self, fan_in, fan_out, bias=True):
self.weight = torch.randn((fan_in, fan_out)) / fan_in**0.5 # note: kaiming init
self.bias = torch.zeros(fan_out) if bias else None这里的权重是二维的,偏差是一维的
根据输入输出的形状,这个线性层内部的样子如下:
(torch.randn(4, 80) @ torch.randn(80, 200) + torch.randn(200)).shape输出是 4x200,最后加的偏差这里发生的是广播语义。
补充一点,PyTorch 中的矩阵乘法运算符十分强大,支持传入高维 tensor,而矩阵乘法只在最后一个维度上起作用,而其他所有的维度则被视作批处理维度(batch dimensions)

这非常利于我们后面要做的事情:并行的批处理维度。我们不希望一下子输入 80 个数字,而是在第一层有两个融合在一起的字符,也就是说只想要 20 个数字输入,如下所示:
# (1 2) (3 4) (5 6) (7 8)
(torch.randn(4, 4, 20) @ torch.randn(20, 200) + torch.randn(200)).shape这样就变成了四组 bigram,bigram 组中的每一个都是 10 维向量
为了实现这样的结构,Python 中有这样一个便捷的方法能够获取列表中的偶数、奇数部分:
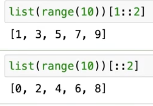
e = torch.randn(4, 8, 10)
torch.cat([e[:, ::2, :], e[:, 1::2, :]], dim=2)
# torch.Size([4, 4, 20])这样明确地提取出了偶数、奇数部分,然后将这两个 4x4x10 的部分连接在一起。

强大的
view()也能完成等效的工作
现在来完善我们的 Flatten 层,创建一个构造函数,并在输出的最后一个维度中获取我们想要连接的连续元素的数量,基本上就是将 n 个连续的元素平展并将他们放到最后一个维度中。
class FlattenConsecutive:
def __init__(self, n):
self.n = n
def __call__(self, x):
B, T, C = x.shape
x = x.view(B, T//self.n, C*self.n)
if x.shape[1] == 1:
x = x.squeeze(1)
self.out = x
return self.out
def parameters(self):
return []- B: Batch size(批大小),代表了批处理中包含的样本数量。
- T: Time steps(时间步长),表示序列中的元素数量,即序列的长度。
- C: Channels or Features(通道或特征),代表每个时间步中数据的特征数量。
输入张量: 输入
x是一个三维张量,形状为(B, T, C)。扁平化操作: 通过调用
x.view(B, T//self.n, C*self.n),这个类将原始数据中连续的时间步合并起来。这里self.n表示要合并的时间步数。操作的结果是将每n个连续的时间步合并为一个更宽的特征向量。因此,时间维度T被减少了n倍,而特征维度C则增加了n倍。新的形状变为(B, T//n, C*n),这样每个新的时间步就包含了原来n个时间步的信息。去除单一时间步维度: 如果合并后的时间步长为 1,即
x.shape[1] == 1,则通过x.squeeze(1)操作去除这一维度,也就是我们之前面对的二维向量情况。

修改后检查中间各层的形状:
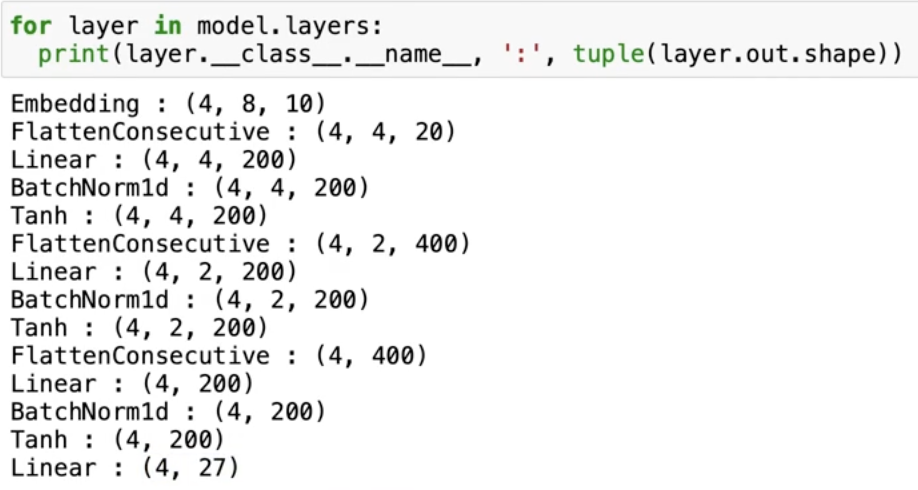
我们希望 batch norm 中,只维护 68 个通道的均值和方差,而不是 32x4 维的,因此改变现有的 BatchNorm1D 的实现:
class BatchNorm1d:
def __call__(self, x):
# calculate the forward pass
if self.training:
if x.ndim == 2:
dim = 0
elif x.ndim == 3:
dim = (0,1) # torch.mean() 可以接受 tuple,也就是多个维度的 dim
xmean = x.mean(dim, keepdim=True) # batch mean
xvar = x.var(dim, keepdim=True) # batch variance现在 running_mean.shape 就是[1, 1, 68]了
扩大神经网络
以及完成了上述改进,我们现在通过增加网络的大小来进一步提高性能。
n_embd = 24 # 嵌入向量维度
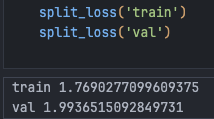
n_hidden = 128 # MLP 隐藏层神经元数量 现在的参数量达到了 76579 个,性能也突破了 2.0 的大关:
到目前为止,训练神经网络所需的时间增长了很多,尽管性能提升了,但是我们对于学习率等超参数的正确设置都是茫然的,只是盯着训练的 loss 而不断 debug 和修改。
卷积
在本节中,我们实现了 WaveNet 的主要架构,但并没有实现其中涉及的特定的 forward pass,也就是一个更复杂的线性层:门控线性层 (gated linear layer),还有残差连接 (Residual connection) 和跳跃连接 (Skip connection)
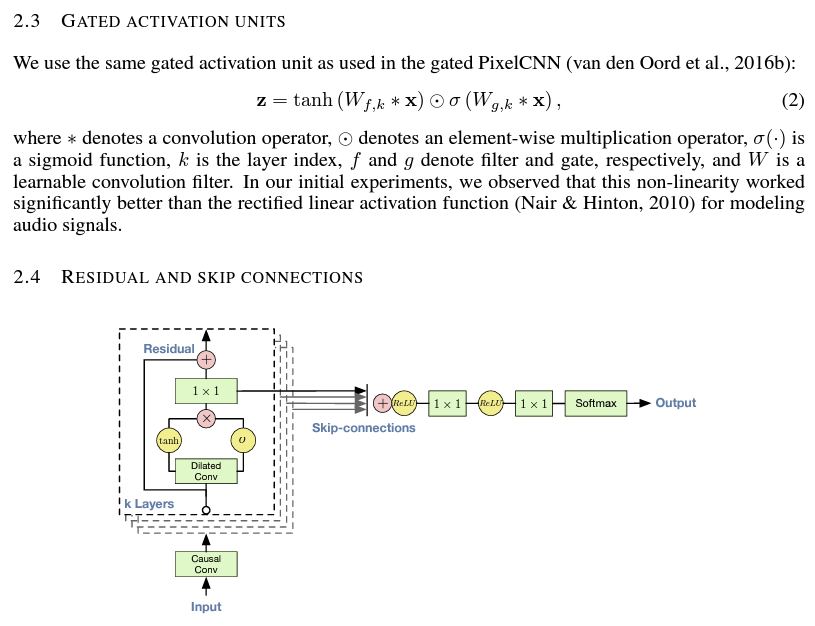
这里简单了解一下我们实现的树状结构与 WaveNet 论文中使用的卷积神经网络相关的地方。
基本上,我们在这里使用卷积 (Convolution) 是为了提高效率。卷积允许我们在输入序列上滑动模型,让这部分的 for 循环 (指卷积核滑动和计算) 在 CUDA 内核中完成

我们只是实现了单一的图中所示的黑色结构并得到一个输出,但卷积允许你通过这个黑色的结构放到输入序列上,像线性滤波器一样同时计算出所有的橙色输出。
效率提升的原因如下:
- for 循环在 CUDA 核心中完成;
- 重复利用变量,比如第二层的一个白点既是一个第三层白点的左子节点,又是另一个白点的右子节点,这个节点和它的值被使用了两次。
总结
本节过后,torch.nn 模块已经被解锁了,后面会把模型的实现转为使用它。
回想一下本节的工作,很多时间都在尝试让各个 layer 的形状正确。因此 Andrej 总是在 Jupyter Notebook 中进行形状调试,满意后再复制到 vscode 中。